How To Frame Completed Jigsaw Puzzles At Home Easily
Learn how to frame completed jigsaw puzzles at home with simple steps, tools, and tips to keep your puzzle art safe, flat, and ready to display.
Mar 22, 202597 Shares48.7K Views
Framing a completed jigsaw puzzle is a popular way to preserve the time and effort put into finishing it. Many puzzlers choose to frame their puzzles not only to protect them but also to enjoy the artwork they’ve assembled. According to Puzzle Warehouseand Ravensburger, framing turns a temporary hobby into a permanent piece of décor. It allows you to display beautiful landscapes, famous artworks, or custom designs that might otherwise be packed away or taken apart. Some people also frame puzzles as meaningful gifts, especially when the image has personal value or was solved as a group activity.
Framing is easier than most people think, requiring just a few tools like puzzle glue, a backing board, and a frame. The process is simple and can be done at home without professional help. Once framed, puzzles stay intact for years, offering both a sense of accomplishment and lasting visual appeal. Whether for decoration, memory, or sharing with others, framing adds extra value to your puzzle-solving experience.
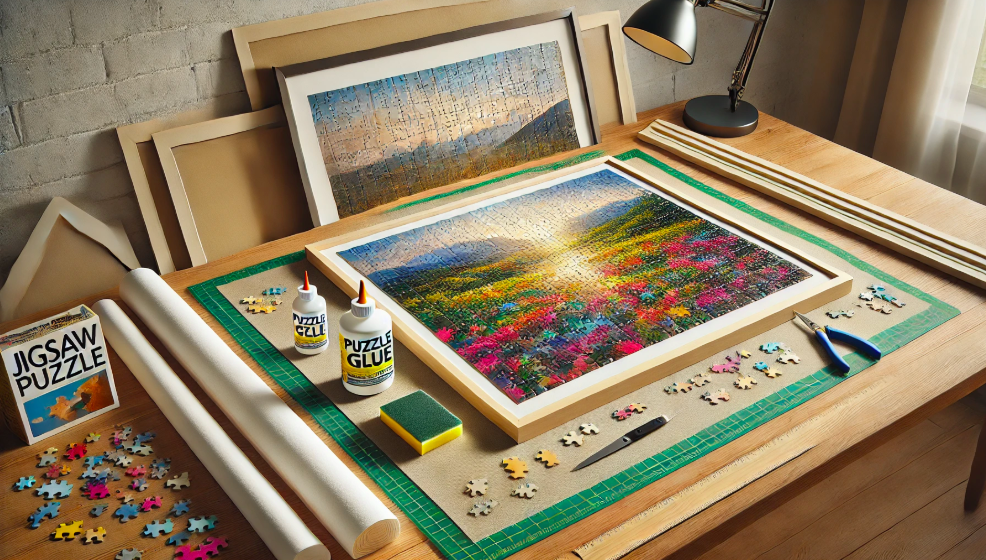
Things You’ll Need Before You Start
Before you begin framing your jigsaw puzzle, having the right supplies ready will make the process smoother and more secure. Most of these items are easy to find online or at craft and hobby stores. According to guides from Puzzle Warehouseand Mod Podge Rocks, here’s a basic list of what you’ll need:
- Puzzle Glue– Special glue made for puzzles helps seal the surface and keep the pieces together. Choose liquid or spray glue based on your preference.
- Sponge Brush or Applicator– For spreading liquid glue evenly across the puzzle without damaging the pieces.
- Wax Paper or Parchment Paper– Placed under the puzzle to protect your working surface while gluing.
- Backing Board– Foam board, mat board, or thick cardboard to support the puzzle once it’s glued and dry.
- Ruler or Measuring Tape– To measure and cut the backing board accurately to match the puzzle’s size.
- Picture Frame– A frame that fits the finished puzzle dimensions. Choose one with or without glass based on how you want to display it.
- Flat Work Surface– A clean, stable table or area where the puzzle can stay in place during gluing and drying.
Optional Tools:
- Puzzle Roller or Rolling Pin– To gently press down the glued surface for even sealing.
- Spray Sealant (Optional)– Some people prefer clear spray sealant for an even finish without using a brush.
Step 1: Prepare The Puzzle For Framing
Before gluing or framing a jigsaw puzzle, it’s important to make sure the puzzle is flat, clean, and complete. Check that all pieces are correctly placed and gently press down any that are sticking up. If the puzzle was stored rolled or folded, lay it flat and place heavy books or a board on top for a few hours to remove any bends or curves. This will help the puzzle stay flat and smooth during the gluing process. Also, use a soft, dry cloth to lightly wipe off any dust or dirt from the surface—this helps the glue stick better.
Next, place a sheet of parchment or wax paper underneath the puzzle. This protects your table or work area from glue spills and keeps the puzzle from sticking to the surface. Make sure the puzzle is on a clean, flat surface with plenty of space around it. Proper preparation like this ensures the puzzle stays in good shape and makes the framing process easier and more effective. This step is simple but very important for a strong, polished final result.
Step 2: Glue The Puzzle Properly
Once your puzzle is flat and in place, the next step is to apply glue carefully and evenly. According to guides from Mod Podge Rocksand Puzzle Warehouse, using the right method helps seal the puzzle without damaging it. Pour a small amount of puzzle glue directly on top of the puzzle and use a sponge brushor a clean, flat card to spread it across the surface. Work gently in straight, even strokes, making sure the glue gets into the cracks between the pieces. Cover the entire surface, including the edges, to help the puzzle stay together once it’s framed.
There are two main types of puzzle glue: liquid glue, which is brushed on, and spray glue, which is applied in a fine mist. Liquid glue gives stronger hold and is easier for beginners to control, while spray glue dries faster but can be messy if not used carefully. Always check the label for drying times—most puzzle glues take 2 to 4 hoursto dry, though some may need longer. Avoid using too much glue, as it can cause the puzzle to warp or leave streaks on the surface. A thin, even layer is enough to keep the puzzle secure and looking clean once it's ready for framing.
Step 3: Mount The Puzzle On A Backing Board
After the glue has dried fully, the next step is to mount your puzzle on a backing board to give it support inside the frame. According to framing tips from Puzzle Warehouseand The Spruce Crafts, the best options for backing are foam boardor mat board. Foam board is lightweight but strong, while mat board offers a thinner, more flexible option. Make sure the board is acid-free to prevent long-term yellowing or damage to the puzzle.
To attach the puzzle, first measure and cut the board to match the exact size of your puzzle using a ruler and craft knife. Be precise for the cleanest fit. Next, gently lift the puzzle by sliding a large, flat object like a thin cutting board or piece of cardboard under it. Slowly transfer it onto the backing board. You can apply a thin layer of glue to the board before placing the puzzle on top, or use strong double-sided tape around the edges to hold it in place. Press down lightly to secure it. This step gives the puzzle stability and makes framing much easier and neater.
Step 4: Choose The Right Frame
Choosing the right frame is an important part of displaying your finished puzzle. The frame protects the puzzle and turns it into a lasting piece of wall art. According to Puzzle Warehouseand Art To Frame, you should first measure the exact size of your glued and mounted puzzle. Use that measurement to pick a frame that fits without gaps or pressure. Many standard frame sizes are available, but if your puzzle has a unique shape, a custom framemay be the best option.
There are several types of frames to consider. A standard photo frameworks well for flat puzzles and is easy to find. A shadow box frameoffers more depth, which is helpful if the puzzle is thick or if you want to include other items like a nameplate or photo. Custom framing is more expensive but offers exact size, material, and color choices. As for protection, you can choose a frame with glassor without glass. Glass helps keep dust and moisture away, but it can cause glare. For a more natural look, some puzzlers skip glass altogether. If you do use glass, make sure the glue is fully dry and the puzzle is tightly mounted to avoid sticking or damage.
Step 5: Insert The Puzzle Into The Frame
Once your puzzle is fully glued and mounted on a backing board, it’s time to place it into the frame. This step should be done carefully to avoid bending or damaging the puzzle. According to framing guides from The Spruce Craftsand Puzzle Warehouse, it’s best to lay the frame face down on a clean, flat surface before inserting the puzzle.
Gently lower the mounted puzzle into the back of the frame, making sure it fits snugly without forcing it. If the puzzle feels too tight, check the frame size again or lightly trim the backing board. Once the puzzle is inside, adjust it to sit evenly, with all sides aligned. Then, place the frame’s backing board or support panel over the puzzle. Secure the backing using the clips, tabs, or fasteners that come with the frame. If your frame doesn’t include them, you can use framer’s tape or flexible tabs to hold everything in place.
Make sure the puzzle doesn’t shift when the frame is upright. If needed, add small foam spacers or cardboard shims behind the backing for a tighter fit. This step keeps the puzzle secure and flat while it hangs on the wall.
Where To Display Your Framed Puzzle
Framed puzzles can add color, personality, and creativity to any room in your home. Many puzzle lovers proudly display their completed puzzles as art pieces. According to suggestions from The Spruceand Puzzle Warehouse, great places to hang a framed puzzle include home offices, game rooms, hallways, bedrooms, or children’s rooms. These areas are ideal for showing off the puzzle without it getting in the way of everyday activities.
It’s important to choose a spot with low humidityand limited direct sunlight. Sunlight can cause puzzle colors to fade over time, and humidity may affect the glue or cause the puzzle to warp. Avoid placing your framed puzzle near bathrooms, kitchens, or windows that get strong light throughout the day. If you want to hang it in a brighter room, consider using UV-protective glass to help reduce fading. Choosing the right location not only keeps the puzzle safe but also lets you enjoy your hard work every day.
Tips To Keep Your Framed Puzzle Looking Great
Keeping your framed puzzle in good shape is easy with regular care and attention. Below are detailed tips organized by category to help protect both the puzzle and the frame over time.
1. Regular Dusting
- Use a soft, dry microfiber clothor feather duster to remove dust from the puzzle surface and frame.
- If your puzzle is not covered with glass, avoid using any sprays or wet cleaners, as moisture can damage the puzzle surface or dissolve the glue.
- For puzzles behind glass, you can use a basic glass cleaner—but always spray onto the cloth, not directly on the frame.
2. Avoid Moisture And Humidity
- Do not hang framed puzzles in humid placeslike bathrooms, kitchens, or laundry rooms.
- High humidity can soften puzzle glue and warp the board, causing the puzzle to bend or come apart.
- If you live in a humid climate, use a dehumidifier in the room or choose a sealed frame to offer extra protection.
3. Keep Away From Direct Sunlight
- UV rays can fade the puzzle imageover time.
- Choose a wall that doesn’t receive strong or direct sunlight, or install UV-protective glassif you want to hang it in a brighter space.
- Curtains or blinds can also help reduce light exposure when not displaying the puzzle.
4. Avoid Heat Sources
- Do not hang puzzles near radiators, fireplaces, or heating vents.
- Heat can dry out the glue or backing board, leading to cracks, warping, or frame separation.
5. Protect Frame Edges And Backing
- Add corner guards or bumpersto the frame to avoid chips and dents, especially if it's hung in a high-traffic area.
- Apply felt pads or wall protectorson the back corners to prevent scratches on walls and reduce movement.
- Check the backing clips or tabsevery few months to ensure they stay tight and haven’t shifted over time.
6. Check Hanging Hardware Regularly
- Over time, wall hooks or frame wires may loosen or wear down.
- Inspect hooks, nails, and frame wires at least twice a year to make sure they are secure.
- Use heavy-duty hanging hardware for large or heavy puzzles to avoid sagging or accidents.
❓FAQs – Related To "How To Frame Completed Jigsaw Puzzles"
Can I Frame A Puzzle Without Using Glue?
Yes, you can frame a puzzle without using glue. You can use clear packing tape or peel-and-stick adhesive sheets on the back to hold the pieces together. Another easy way is to place the puzzle in a tight-fitting frame, which keeps it stable without any glue. These methods are simple, clean, and keep the puzzle in good condition.
What Type Of Glue Is Best For Framing Puzzles?
To frame a jigsaw puzzle, it's best to use a clear-drying, strong adhesive designed for puzzles. Mod Podge Puzzle Saveris a popular choice; it's easy to apply and dries clear, preserving the puzzle's appearance. Another good option is MasterPieces Jigsaw Puzzle Glue, which comes with an applicator for even spreading. SunsOut Puzzle Preserveralso offers a clear finish and includes a brush for application. These specialized glues ensure your puzzle stays intact and looks great when framed.
Should I Use Glass In The Puzzle Frame?
Using glass in a puzzle frame is recommended to protect the puzzle from dust and moisture. Clear glass or acrylic sheets serve this purpose effectively. Additionally, incorporating a mat between the puzzle and the glass prevents direct contact, reducing potential deterioration over time. Therefore, including glass in your puzzle frame is advisable for long-term preservation and display quality.
Can I take the puzzle out of the frame later?
Yes, you can remove a puzzle from its frame later, but the ease of doing so depends on how it was mounted. If the puzzle was glued to a backing board, removal may be difficult and could damage the puzzle. However, if the puzzle was framed without glue, using methods like clear packing tape on the back or a tight-fitting frame, you can usually take it out without harm. Some enthusiasts prefer not to glue their puzzles, allowing them to disassemble and store or reuse them later.
How long should I wait after gluing before framing?
After applying glue to your completed puzzle, it's important to let it dry thoroughly before framing. While the surface may feel dry after about 20 minutes, it's best to wait at least 12 hours to ensure the glue has fully cured and bonded between the pieces. This patience helps prevent any warping or damage when you place the puzzle into a frame.
Jump to
Things You’ll Need Before You Start
Step 1: Prepare The Puzzle For Framing
Step 2: Glue The Puzzle Properly
Step 3: Mount The Puzzle On A Backing Board
Step 4: Choose The Right Frame
Step 5: Insert The Puzzle Into The Frame
Where To Display Your Framed Puzzle
Tips To Keep Your Framed Puzzle Looking Great
❓FAQs – Related To "How To Frame Completed Jigsaw Puzzles"
Latest Articles
Popular Articles