Summoning Training RS3 - Best Route For Mains And Ironman
Summoning Training RS3 for real players: save blue charms, plan spirit shards, use better boosts, and choose the smartest route for your account.
Apr 03, 20264.4K Shares372.6K Views
Your Master Guide To Summoning Training In RS3
If you want the best Summoning Training RuneScape 3route, the right answer is to pick pouches based on your charms, GP, boosts, and account type, then train at the most efficient obelisk loop you can support.
In short
- Fastest XPcomes from strong pouch choices, stacked boosts, and a clean training loop.
- Cheapest trainingcomes from protecting rare charms and watching your GP-per-XP.
- Blue charms are usually worth savingfor stronger later pouches.
- Taverleyis still the easiest place to start and one of the most practical places to train.
- Ironman should follow a separate logicbecause self-sufficient supply matters more than textbook XP rates.
- Use a Summoning calculator before buying in bulkso you do not waste shards, focus, or secondaries.
- Live prices and event rules can change, so volatile details should be checked against official sources.
Quick Answers
If you want the fastest XP on a main:use a bulk pouch route at a clean obelisk loop, stack every reasonable boost you own, and avoid low-value pouches just because they appear on a generic chart.
If you want the cheapest route:protect blue charms, spend easier-to-replace charm tiers first, and calculator-check GP-per-XP before buying a full session of shards and secondaries.
If you are Ironman:pick pouches based on which secondaries and charms you can actually replace next week, not just on which pouch looks best in a static XP table.
Best default training hub:Taverley for simplicity and accessibility. Menaphos and Prifddinas can be better if you already live there and your banking loop is cleaner.
Summoning Training RS3 At A Glance
This section gives you the short answer most players actually wanted when they searched. Once you know which lane you belong in, the rest of the article becomes much easier to apply.
The Fastest Way To Train Summoning In RS3
The fastest route is usually a high-XP pouch plandone in bulk at an efficient obelisk setup, with as many legitimate boosts stacked as possible. On a main account, speed improves even more when you remove banking friction and stop crafting low-value pouches just because they appear in a generic level chart.
The Cheapest Way To Train Summoning In RS3
The cheapest route is rarely the route with the lowest level requirements. It is the route that gives you the most XP for the charms you can replace most easily, while avoiding rare-charm waste and expensive convenience upgrades you do not need. Community calculators exist for exactly this trade-off problem.
The Best Summoning Route For Ironman
Ironman should treat Summoning as a supply chain problem: charms, secondaries, shards, and time-to-restockmatter more than textbook XP efficiency. Jagex’s official Ironman rules ban trade and XP handouts, so routes that are excellent for mains can be actively bad for Ironman.
What Changes If You Only Have Limited Charms
If charms are scarce, focus less on the highest unlocked pouch and more on charm efficiency. In practice, that usually means protecting blue charms, being selective with crimson, and planning your route before you buy supplies.
Key Takeaways Before You Buy Shards Or Ingredients
Use this quick decision table before you commit money:
| Your bottleneck | Best training lane |
| You want the shortest grind | Fastest XP |
| You are low on GP | Best value per GP |
| You are low on rare charms | Best value per charm |
| You are Ironman | Self-sufficient / Ironman lane |
If you want the shortest answer: mains should usually default to a Taverley-centered calculator route, while Ironmen should default to repeatable crimson-heavy or low-friction self-sufficient routes.
How Summoning Works In RS3
You do not need a lore lecture to train Summoning well. You need a clean mental model of what goes in, what comes out, and what part of the process actually gives XP.
What Summoning Is And Why It Matters
Summoning is a members-only skill built around creating pouches that let you call familiars for combat, utility, inventory space, and skilling support.
What You Need To Make A Pouch
Every standard pouch starts from the same core inputs:
- a charm
- spirit shards
- an empty pouch
- a tertiary ingredient
Community-maintained Summoning references describe pouch creation the same way, and the official item database confirms that spirit shards and blank pouches remain the standard production inputs.
How Pouch Creation Gives Summoning XP
Your main XP comes from making pouches, not from merely owning familiars later. Some routes add extra efficiency by converting pouches into scrolls at an obelisk, but that is a speed-and-cost choice, not a beginner default. Community Summoning-scroll references note that each pouch converts into 10 scrolls.
Where To Start Summoning
Jagex still tells new players to speak to Pikkupstix in Taverleyand use the Wolf Whistlepath as their starting orientation. Community references add an important nuance: Wolf Whistle functions as the introduction even though modern training references do not always treat it as a hard gating requirement.
Starting Summoning As F2P
Officially, most members skills can be trained to level 5by non-members as a preview, and Summoning follows that model. That makes F2P Summoning useful as a small setup phase, not as a long-term training environment.
Which Pouches F2P Players Can Make
Community RS3 references consistently point to Spirit wolfand Dreadfowlas the practical F2P pouches that take you to that preview cap.
What F2P Players Can Do With Pouches After Level 5
Even after the preview cap, it can still make sense to hold gold charmsfor later membership rather than treating F2P progress as wasted time. That is one of the few cases where “prepare now, train later” is genuinely efficient.
The takeaway is simple: Summoning is an input-heavy skill, so the smartest upgrades are the ones that improve those inputs.
Useful Items That Improve Summoning Training
This is where a decent route becomes a good one. If you ignore the charm-saving and XP-boost layer, you can easily spend far more GP and time than you needed to.
Spirit Gems
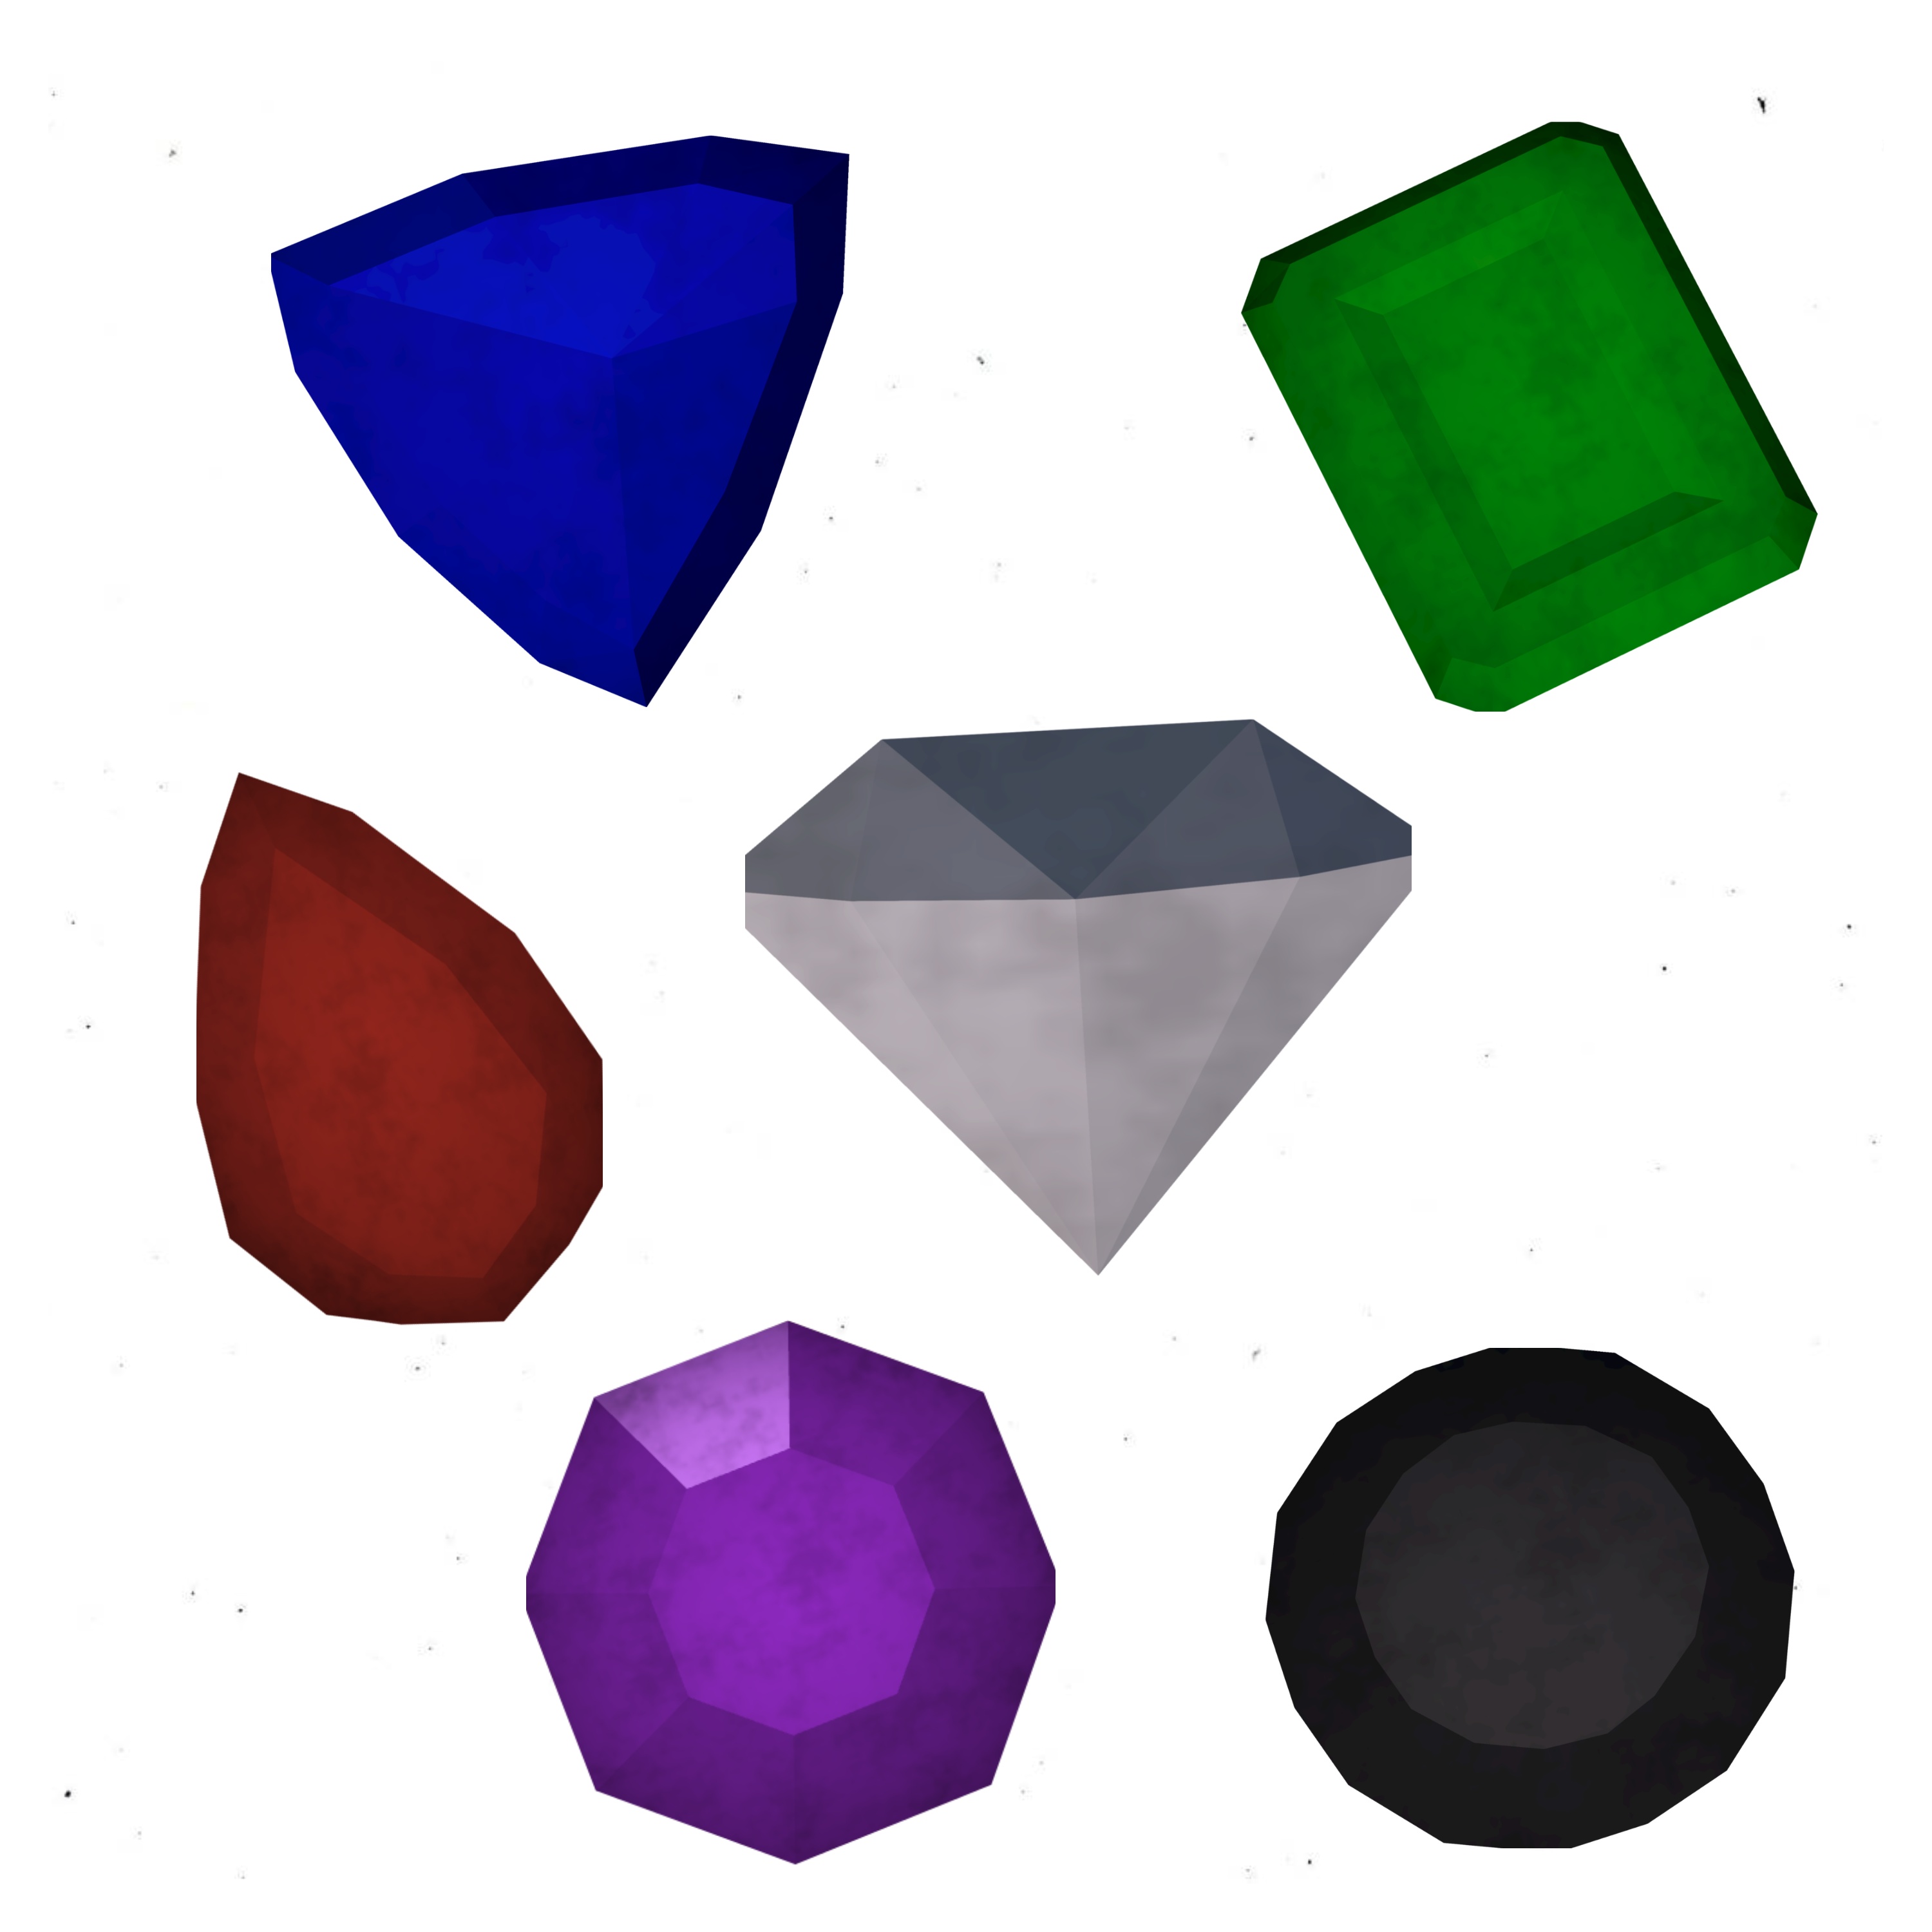
Spirit gems are the baseline charm-saving tool for Summoning training. Their value is highest when you are spending rare or hard-to-replace charms, especially blue charms, and lower when your bottleneck is a cheap secondary or a short training session.
Shaman’s Outfit
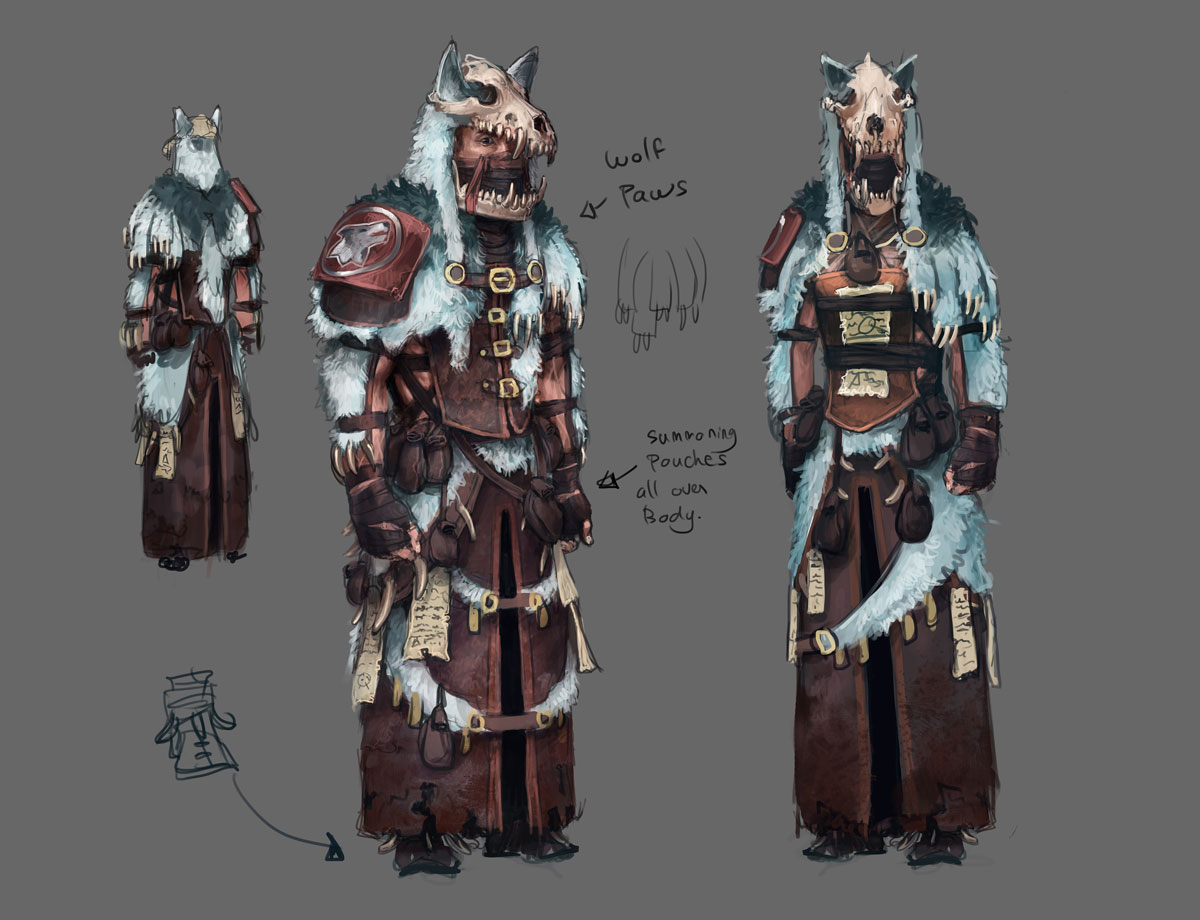
The Shaman’s outfit is worth real attention because it is not just cosmetic. Community-maintained RS3 references describe the set as giving 1% Summoning XPper piece plus a 1% set bonus, for 6% totalwhen all five pieces are worn.
The more useful long-term upgrade is Modified Shaman’s Headwear. Community-maintained references describe it as giving 1% Summoning XP, 300 daily spirit shards if you own fewer than four outfit pieces or 500 daily spirit shards if you own at least four, plus an occasional charm-saving effect while infusing pouches.
That makes it one of the few upgrades that improves XP, supply flow, and long-session value at the same time.
If you already have the outfit, use it. If you can upgrade to Modified Shaman’s Headwear, that upgrade is even more useful because it combines XP gain with daily shard support and extra long-session value.
Spirit Onyx

Spirit Onyxis the premium charm-saving option for players doing large, efficiency-focused Summoning sessions. It is most useful when you are burning high-value charm tiers and want to reduce long-run loss, but it is not necessary for budget or casual training.
Summoning Cape Perk

The Summoning cape is the official Cape of Accomplishment for masters of the Summoning skill. While it serves as a prestigious symbol of reaching level 99, it also provides a functional passive bonus that adds steady value during late-game training.
The Summoning cape perk is a passive late-game bonus that helps save charms while creating pouches. While it won't single-handedly define your training route, it offers significant long-term savings-especially when stacked with other charm-saving effects.
Summoning Focus

The official Grand Exchange database describes Summoning focusas an item that boosts Summoning XP gains, and its live guide price sits at 3,500 GP. Using a focus grants an extra 20%Summoning experience per pouch made.
The right way to think about Summoning focus is this: it is excellent for speed, but its value depends on what you are trying to save. If your limiting factor is time, it is often attractive. If your limiting factor is GP, that live GE price needs to be built into your pouch math before you commit.
Other Useful Quality-of-life Tools
A few tools do not directly create XP but still matter:
- Presetsreduce banking mistakes.
- A deposit solutioncan make Taverley loops smoother.
- A Beast of Burdencan help with bulk sessions.
- If you own Fang of Mohegan, Jagex says it provides a daily teleport to a large Summoning obelisk and can also help with charm drops in combat.
Best optional upgrades if you train Summoning in large batches
- Modified Shaman’s Headwear
- Spirit Onyx
- Summoning cape perk
- Summoning focus
- Charming Imp for the farming side, not the crafting side
The big idea is that Summoning rewards preparation, which is why the next move is choosing your lane before you buy anything.
Choose Your Training Lane Before You Spend Anything
Most bad Summoning sessions happen because players mix goals: they say they want cheap training, then copy a speed route.
Lane 1 - Fastest XP
Pick this lane if you want levels quickly and accept that convenience items, boosts, and stronger pouch choices can raise cost. Fast XP is about throughput: more pouches, better boosts, less friction.
Lane 2 - Best Value Per Charm
Pick this lane if charms are harder to replace than GP. This lane matters most for blue charms, for returning players with uneven charm piles, and for anyone who hates wasting future XP potential.
Lane 3 - Best Value Per GP
Pick this lane if your bank matters more than shaving hours off the grind. Here, you should be much more skeptical of expensive boosts and any route that looks good only because it assumes unlimited money.
Lane 4 - Ironman Or Self-sufficient Training
Pick this lane if replacing secondaries or charms is slow. Ironman training is about repeatability: what can you rebuild next week without relying on the Grand Exchange? Jagex’s Ironman rules make that distinction non-negotiable.
Which Lane Fits Your Account Right Now?
Use this short checklist before a session:
- I have enough GP to value speed over thrift.
- I have more crimson than blue charms.
- I can restock my secondaries easily.
- I care more about 99/120 timingthan total cost.
- I am training on a main, not a supply-constrained Ironman.
If most of those are true, lean Fastest XP. If not, lean Best valueor Ironman. The next section explains why spirit shards are the hidden cost most players underestimate.
Related Reading: Merge Mansion Wiki
Spirit Shards Explained

Spirit shards look cheap one at a time, which is exactly why players misprice Summoning. The number you should care about is not shard price in isolation, but shard price multiplied across hundreds or thousands of pouches.
What Spirit Shards Are Used For
Jagex’s item database defines spirit shards as an item “used in Summoning for training and production.” That plain description is enough: if you are making standard pouches, shards are one of your fixed baseline costs.
Where To Buy Spirit Shards
The practical answer is simple: get them from the route you already use for Summoning supply purchases, then benchmark against the live official GE guide price. For planning purposes, the important number is the official market reference, not the trivia of how you sourced them.
Why Shard Planning Matters More Than Most Players Think
The official GE guide price for spirit shards is 24 GP(Data as of April 2026; check the latest official guidance). That sounds tiny until you scale it. A pouch that uses 200 shards carries 4,800 GPin shard cost before you count the pouch, charm, focus, or tertiary ingredient.
Common Shard-buying Mistakes
The biggest mistakes I see are:
- buying shards before finalizing the pouch mix
- ignoring focus cost on top of shard cost
- overbuying for a route that changes once you price secondaries
- treating shard cost as “basically free”
The fix is to decide your pouch plan first, which is why the next section goes deeper than a simple level chart.
Which Pouches Should You Make?
This is the part most pages oversimplify. “Best pouch” is not one answer. It is a function of charm color, GP tolerance, secondary friction, and what you are trying to optimize.
The Decision Model Behind Pouch Choice
I use four filters:
- XP per charm
- GP per XP
- tertiary ingredient availability
- opportunity cost
That last one is the most missed. If you burn a rare charm on a merely acceptable pouch now, you lose the option to spend it on a much better pouch later.
A Simple Rule Before You Choose Any Pouch
- If you are low on GP, favor crimson routes over flashy blue routes.
- If you are low on rare charms, protect blue charms unless the later upgrade path is weak.
- If you are Ironman, choose the pouch with the least painful secondary, not just the best XP.
Worked Calculator Logic
A calculator becomes most useful when your charm pile is uneven or your budget is capped. This is where generic “best pouch” advice stops being enough and exact trade-offs start to matter.
Say you have:
- 2,000 crimson charms
- 150 blue charms
- a main account
- a hard ceiling of 20 GP per XP
Now add fixed inputs. Spirit shards are 24 GP each and Summoning focus is 3,500 GP on the official GE. If one candidate pouch needs 200 shards, that is already 4,800 GP in shards. If you also use focus, your fixed cost rises to 8,300 GP before the tertiary ingredient.
That is where a named comparison matters. If two candidate pouches are close in XP but one burns blue charms while the other uses crimson with easier secondaries, the crimson option often wins for a 20 GP/XP ceiling even if the headline XP is a little lower. That is the kind of trade-off a calculator should confirm before you commit.
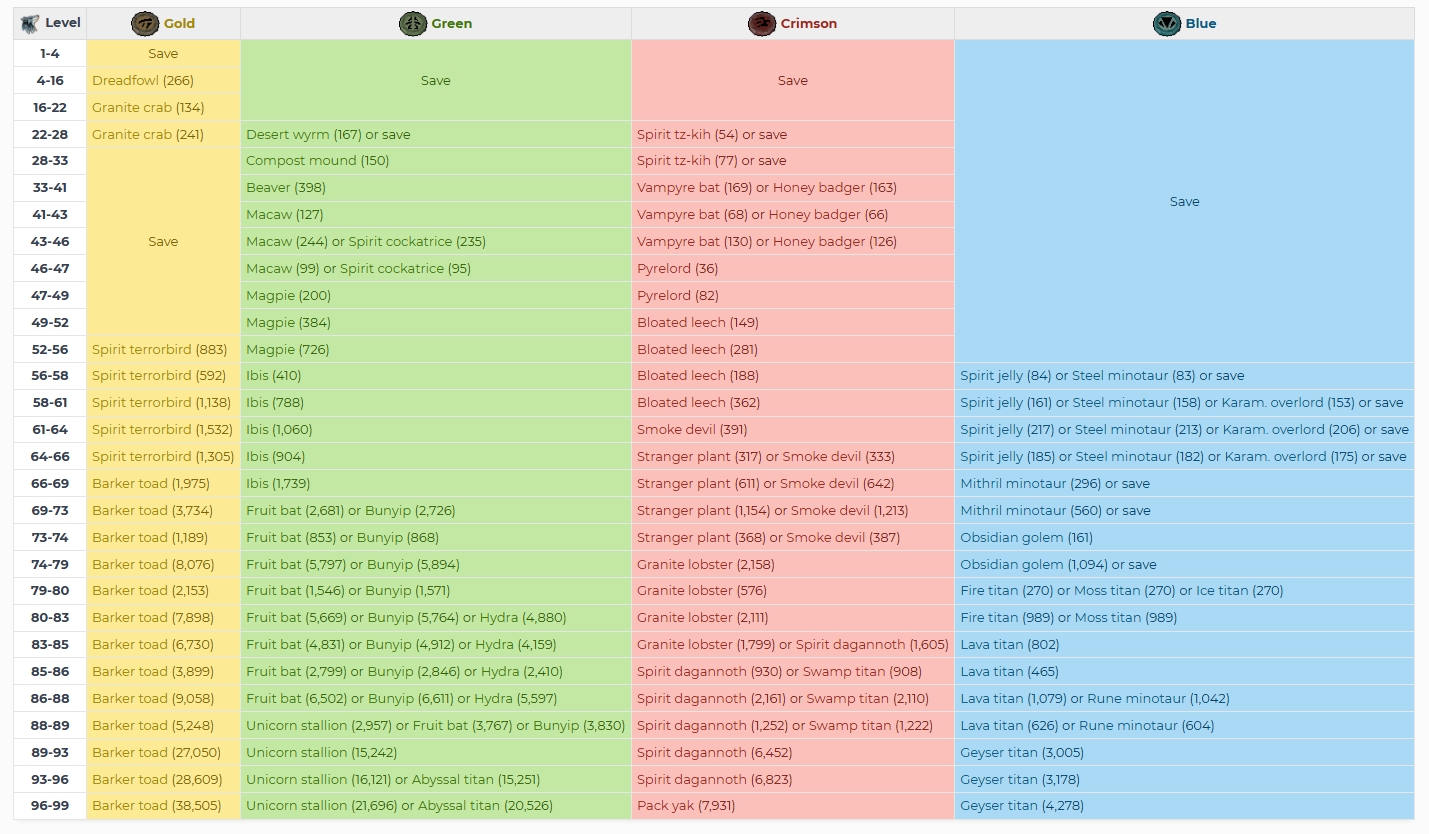
Best Pouches To Make By Level
You still need a level path. The difference is that you should now read each bracket through the lens of your chosen lane.
| Level band | Best picks and notes |
| 1–16 | Fastest: Spirit Wolf / Dreadfowl. Best value: Dreadfowl. Ironman-safe: Dreadfowl. Why: Simple start, cheap setup. |
| 16–52 | Fastest: Granite Crab / Spirit Tz-Kih / Honey Badger. Best value: Granite Crab / Honey Badger. Ironman-safe: Granite Crab / Beaver. Why: Smooth early climb. |
| 52–74 | Fastest: Bloated Leech / Spirit Jelly / Steel Minotaur. Best value: Bloated Leech / Spirit Terrorbird. Ironman-safe: Spirit Terrorbird / Bloated Leech. Why: Good charm efficiency. |
| 74–89 | Fastest: Granite Lobster / Moss Titan / Rune Minotaur. Best value: Granite Lobster / Fire Titan. Ironman-safe: Granite Lobster. Why: Strong mid-late XP. |
| 89–99 | Fastest: Geyser Titan / Abyssal Titan / Pack Yak / Steel Titan. Best value: Geyser Titan / Steel Titan. Ironman-safe: Geyser Titan / Pack Yak. Why: Major payoff bracket. |
| 99–120 | Fastest: Geyser Titan / Abyssal Titan / Pack Yak / calculator-led high-tier route. Best value: Route depends on cost ceiling. Ironman-safe: Repeatable high-tier crimson/blue routes. Why: Calculator matters most. |
Levels 1–16
- Fastest Option: Use the early F2P-capable pouchesto clear the opening levels quickly. Spirit wolf and Dreadfowl are the obvious stepping stones.
- Best Value Option: Spend the common charms you replace most easily. At this stage, over-optimizing is usually worse than simply moving up.
- Ironman Note: Do not obsess over perfect efficiency here. Your goal is to unlock better future options, not to win the first ten levels.
Levels 16–52
- Fastest Option:Choose pouches that move you through the low tiers without loading too much cost into awkward secondaries.
- Best Value Option:This is a good window to use gold and greenintelligently and leave your more valuable charm tiers intact.
- Ironman Note:If a tertiary ingredient is annoying to farm, that friction matters more than a small XP difference.
Levels 52–74
- Fastest Option:Now the route starts to matter. Mid-level pouches can push XP much faster, especially if you already have boosts lined up.
- Best Value Option: Crimson-backed pouches often begin to look much stronger here than “whatever I can make right now.”
- Ironman Note:Favor repeatable farms and ingredients you can batch, not pouches that look great only on paper.
Levels 74–89
- Fastest Option: This is where many mains start leaning harder into stronger crimson or blue options if the goal is speed.
- Best Value Option:If your bank is limited, keep comparing close alternatives instead of blindly taking the highest unlocked pouch.
- Ironman Note:A steady route is better than a flashy route that stalls once one ingredient dries up.
Levels 89–99
- Fastest Option:High-XP familiars begin to justify serious speed setups, especially if you are pushing hard toward 99.
- Best Value Option:Do not let the “nearly there” feeling trick you into burning rare charms inefficiently.
- Ironman Note:Reserve rare charms for pouches that feel genuinely worth the grind.
Levels 99–120
- Fastest Option:The logic does not change. You are still choosing between speed, cost, and supply depth, just at a larger scale.
- Best Value Option:At 99+, calculator planning matters even more because small mistakes compound over millions of XP.
- Ironman Note: If you are going to 120 on Ironman, consistency beats glamour every time.
The bracket chart gets you moving, but charm allocation is what keeps the route efficient.
Which Charms Should You Spend First?
Charm management is the real engine of Summoning efficiency. Most players who say the skill is too expensive are actually describing bad charm allocation.
Gold Charms
Use these early and freely. They are the least painful charm tier to spend and are ideal for smoothing low-level progress.
Green Charms
Use them where the secondaries are painless and the pouch is not obviously dominated by a better nearby option.
Crimson Charms
These are often your main training currency. Community sources consistently treat monsters like waterfiendsand glacorsas strong charm farms because crimson is the tier many serious routes are built around.
Blue Charms
Save them unless you have a very good reason not to. Community references describe blue charms as the rarest of the main charm types and among the strongest in XP potential.
When You Should Save Rare Charms For Later
Save rare charms when:
- you are still climbing fast through weaker pouch tiers
- you lack the best later unlocks
- you are not certain the current pouch is calculator-approved
- you are Ironman and replacement is slow
When A Calculator Should Override Generic Charm Advice
A calculator wins when your actual pile is unusual. If you have almost no blue charms and a mountain of crimson, the mathematically right answer may differ sharply from a generic wiki chart. That is a feature, not a bug.
Once you know which charm tier you can afford to spend, pouch choice becomes much easier. That is where charm-farming routes start to matter.
Best Ways To Obtain Charms In RS3
You do not need every monster in the game. You need a shortlist that matches your combat level, your account type, and the charm color you are missing.
Best charm sources by goal
| Goal | Best type of source |
| General account progress | Slayer |
| Bulk crimson | Waterfiends and similar repeatable farms |
| Bulk blue | Glacors / higher-end blue-capable bosses |
| Low effort | Long Slayer sessions with auto-collection |
| Ironman repeatability | Slayer + weekly support + low-friction farms |
Slayer As The Default Charm-farming Path
For most players, Slayer is the default answerbecause it turns charm gathering into progress on another skill instead of a pure Summoning chore. Community Summoning references specifically note that many Slayer assignments have favorable charm drops.
Best Low-level Charm Sources
Common starter farms include:
- Gelatinous Abomination
- Rock Crabs
- Moss giants
- Ice giants
- Goblins
- Giant rock crabs
These are most useful when you need accessible kills more than perfect efficiency. Community charm references also single out Gelatinous Abominationsas an effective gold-charm source.
If you want a practical example of a low-level charm-farming setup, this video is a good watch.

This Could Be The Best Place To Get Charms For Low Levels! Easy AFK Charms - Runescape New acc EP 24
Best Mid-game And General-purpose Charm Sources
Useful mid-game options often include:
- Greater demons
- Hellhounds
- Black demons
- Rock lobsters
- Cave bug
I think of this tier as the “good enough to sustain training” band rather than the “best in slot” band.
Best Crimson Charm Sources
The names most players keep coming back to are:
- Waterfiends
- Gladii
- Bork
- Greater demons
- Hellhounds
Waterfiends, in particular, remain one of the classic crimson farms; community references still describe them as having a very high crimson-charm rate.
Best Blue Charm Sources
When you specifically want blue-charm pressure, look harder at:
- Tormented demons
- Glacors
- King Black Dragon
- Kalphite Queen / Exiled Kalphite Queen
- Exiled kalphite guardians
Glacors are especially notable because community strategy pages still describe them as a good source of both crimson and blue charms.
Best Task-based Or Niche Combat Sources
Situational picks can still be excellent when they line up with your account:
- Ascension members
- Troll brute and Troll chucker
- other task-specific creatures that fit your Slayer flow
Non-combat Ways To Obtain Charms
Firemaking
Community charm references note that fire spiritscan provide charms while burning logs on a bonfire.
Hunter
Spirit implingsand related Hunter paths can contribute charms, especially if you prefer non-combat support methods.
Thieving
Community references also list Dorgesh-Kaan rich chestsas a Thieving-based charm source.
Familiarisation As A Weekly Charm Boost
Familiarisation is worth treating as a real Summoning support tool, not just a side distraction. It improves charm income directly, which matters because charm supply is one of the biggest limits on efficient Summoning training.
If you are actively training Summoning, this weekly activity is one of the cleanest ways to improve your next farming session without repeating the same combat grind over and over.
Charming Imp
The Charming Imp is one of the best quality-of-life upgrades for charm farming. It does not increase your drop rate, but it removes the friction of missed drops, messy looting, and wasted attention during longer combat sessions.
For players doing Slayer, repeatable mob farms, or any extended charm grind, it makes the whole process cleaner and more reliable.
Which Charm Source Is Best For Mains Vs Ironmen
Mains should prioritize time efficiency. Ironmen should prioritize routes they can repeat without bottlenecking another scarce resource. That is the same decision framework you used earlier, now applied to charm farming.
Now that you know where the charms come from, the next step is making pouches without wasting movement.
How To Make Pouches Efficiently
Execution matters in Summoning more than many players expect. A smart pouch plan loses a lot of value if the run itself is clumsy.
The Standard Obelisk Method
The baseline method is simple: bring your pouch materials to an obelisk, craft in bulk, and repeat. Jagex’s beginner materials and official item descriptions still frame Summoning around that obelisk-centered production loop.
Methods Using Special Teleports
If you own special teleports, use them to reduce dead travel. Jagex’s Fang of Mohegannews post specifically says the necklace grants a daily teleport to a Summoning obelisk.
Methods Using Beasts Of Burden
Beasts of Burden can improve long sessions by reducing trips or supporting the loop around your bank and obelisk workflow. They are most valuable when you are doing large-volume sessions rather than quick top-ups.
The Fastest Taverley Loop
Taverley stays relevant because it is intuitive, compact, and anchored by Pikkupstix. That alone makes it the best starting hub for most players.
Preset Setup
Build one preset for the exact pouch you are making. One preset, one pouch type, one clean loop.
Banking Flow
Do not improvise each trip. Withdraw identical batches every cycle.
Buying And Refilling Flow
If you need more shards or pouches mid-session, refill in bulk rather than breaking the loop every few minutes.
When To Use A Portable Deposit Box
Use a deposit solution when it materially shortens the cycle. Skip it when your loop is already clean enough and the extra setup cost is not worth it.
When Scroll Conversion Is Worth It
Scroll conversion is worth it when you are pushing for speedand accept higher cost. Community Summoning-scroll references note that pouches convert into scrolls at the obelisk, creating a faster but more expensive path.
Fastest Main-account Taverley Loop
- Set one preset for a single pouch.
- Withdraw identical batches every cycle.
- Use the nearest refill or shop route only in bulk.
- Deposit or convert based on whether you value lower cost or faster throughput.
- Do not switch pouches mid-session unless the calculator tells you to.
Where To Train: Taverley Vs Other Options
- Taverley:the easiest default for most players.
- Amlodd / Prifddinas:worth checking when the local setup or active bonuses improve your real throughput.
- Other obelisks:use them only if they genuinely reduce your travel time or fit your route better.
Which Setup Is Best For Bulk Training Sessions
For bulk sessions, I prefer:
- a single-pouch preset
- planned shard totals
- price-checked boosts
- a fixed training lane
- no mid-session decision changes
That is the difference between “I trained Summoning” and “I burned money figuring it out as I went.”
How Many Spirit Shards Should I Buy?
This is one of the most practical questions in the whole skill, and the answer is refreshingly simple: only buy against a finalized pouch plan.
Why Guessing Is Expensive
If you guess high, you lock money into an unfinished plan. If you guess low, you break your rhythm and lose time in the middle of the session.
How To Estimate Shards Manually
Manual estimate:
- choose the exact pouch
- check shards per pouch
- multiply by expected pouch count
- add a small buffer only if your route is final
Formula: pouches needed × shards per pouch = base shard total
How To Use A Summoning Calculator To Get The Exact Number
A good calculator lets you input your current level, goal, charm counts, and chosen pouch mix. That is the right moment to replace rough planning with exact planning.
Sample Shard-buying Scenarios
- Fast 99 push:buy exactly for your chosen speed route plus a small safety margin.
- Budget route:buy only after confirming GP-per-XP stays inside your limit.
- Ironman mindset:plan against what you can actually restock, not against a perfect theoretical route.
Example: If your calculator says 1,200 pouches and each pouch needs 150 shards, buy 180,000 shards, then add only a small buffer if your route is final.
The more exact your shard plan, the easier it becomes to decide what to do with the finished pouches.
What To Do With The Pouches
A pouch is not always an end product. Sometimes it is a training item, sometimes a utility unlock, and sometimes a stepping stone into scrolls.
When To Keep Pouches For Utility
Keep pouches when the familiar itself is the payoff: inventory space, skilling support, combat utility, or travel efficiency. Summoning is too useful a skill to treat every pouch as disposable.
When To Convert Pouches Into Scrolls
Convert when your plan values faster XP flow more than lower cost. Community scroll references state that each pouch becomes 10 scrolls, which is why the method is popular for speed routes.
When To Use Familiars Immediately
Use them immediately when the familiar solves a current problem: bossing, long skilling trips, or carrying capacity.
What F2P Players Should Do With Pouches
For F2P, the smart play is usually to treat early pouches as preview content and save long-term planning for membership. Official skill rules cap the members-skill preview at level 5.
Which Pouches Are Worth Holding Onto Long-term
The pouches worth keeping are the ones tied to real gameplay value, not just the ones that happened to be efficient XP. That is why utility familiars matter in the next section on Ironman and beyond.
It also helps to think about value recovery. Some pouches are worth keeping for utility, some are worth converting into scrolls for speed, and some are worth evaluating based on how much practical value you get back from them later rather than treating every pouch as disposable.
Ironman Summoning Training RS3
Ironman deserves its own section because main-account advice breaks down fast once trade disappears. Jagex’s own Ironman description says it plainly: no trade, no XP handouts.
How Ironman Changes Summoning Priorities
Ironman turns Summoning into a planning skill. You are not just choosing pouches. You are choosing how often you want to re-farm charms, secondaries, and support items.
Charm Farming Priorities For Ironman
Prioritize charm farms you can repeat cleanly, especially those that overlap with Slayeror other meaningful progression. Time spent farming should ideally solve more than one problem.
Ingredient Bottlenecks Ironmen Should Plan Around
On Ironman, the tertiary ingredient is often the true gate. A pouch with lovely XP looks much worse once the secondaries become annoying to rebuild.
Best Pouch Strategy When Supplies Are Limited
When supplies are limited, favor:
- crimson over impulsive blue spending
- repeatable secondaries
- practical unlocks over perfect charts
- calculators over static route copying
What Ironman Players Should Not Copy From Main-account Guides
Do not copy:
- cash-heavy focus usage without checking your supply depth
- GE-dependent “best pouch” routes
- routes that assume fast replacement of rare secondaries
- Double XP timing tricks
Jagex’s event pages have repeatedly stated that Ironman accounts do not receive the Double XP boost.
The good news is that Ironman can still train Summoning very well; you just need more discipline about side sources of XP.
Alternative Methods Of Gaining Summoning Experience
These methods matter, but they are support tools. For most players, they do not replace pouch-making as the core of the skill.
Distractions And Diversions
Familiarisationdeserves the most attention here because it improves your charm economy directly. It works best as a weekly support tool that makes your next farming session more productive.
Completing Quests
Quest XP can smooth awkward level gaps, especially when you want to skip weak pouch tiers instead of forcing them.
Other Passive Or Supplemental XP Sources
Community references also document daily challengesas a source of Summoning XP, which makes them a decent top-up rather than a main strategy.
When Alternative XP Changes Your Pouch Route
Alternative XP matters most when it lets you skip a bad bracket. That is the cleanest use case. If it does not change your pouch decision, it is helpful but not central.
Once the grind is underway, the best motivation is knowing which unlocks are actually worth caring about.
Best Familiars Worth Unlocking While You Train
This section keeps the grind outcome-focused. Summoning feels better when you know what practical power you are buying, not just how much XP a pouch gives.
| Familiar type | Best example and why it matters |
| Beast of Burden | Pack Yak - Extends trips and adds major convenience. |
| Combat | Steel Titan - Strong late-game combat value. |
| Utility / skilling | A named skilling familiar that supports your current goal - Makes the grind pay off outside Summoning itself. |
Best Combat Familiars
Combat-oriented familiars matter because Summoning is explicitly designed to support fighting as well as skilling. Community Summoning references describe familiars as helping in combat through attacks and special moves.
Best Utility Familiars
Utility familiars are often the most underrated long-term unlocks because they save time everywhere else in the game.
Best Beast Of Burden Familiars
Beasts of Burden are among the most valuable practical unlocks in Summoning because they stretch trips, reduce banking, and make many loops smoother. This is one of the clearest reasons the skill remains worth training beyond pure maxing.
Best Skilling Familiars
Skilling familiars are worth targeting when they materially improve your next goal, not just because they are listed on a high-level familiar page.
Unlocks That Make Future Training Easier
The best unlocks are the ones that help you earn more charms, stay out longer, or reduce friction. That is also why it is easy to waste materials on the wrong habits.
Mistakes That Waste Charms, Shards, And GP
Most losses in this skill are avoidable.
Spending Blue Charms Too Early
Impatience is usually the reason players waste their best future options.
Buying Shards Before Planning Your Route
Shards are cheap individually and expensive in aggregate.
Copying A Fastest-XP Method That Does Not Fit Your Budget
A speed method is only “best” if you can actually absorb the live cost. Summoning focus at 3,500 GPand spirit shards at 24 GPalready change the math before you count any secondary item.
Ignoring Boosts And Long-term Charm-saving Tools
Spirit gems, Modified Shaman’s Headwear, Spirit Onyx, the Summoning cape perk, and Charming Imp all improve long-run efficiency in different ways.
Overvaluing Tiny Efficiency Gains
The perfect pouch on paper is not actually perfect if it adds miserable farming friction or makes you dread the session.
Also Check Out: MapleStory Reboot Breakdown
Summoning Training RS3 FAQ
What Is The Best Way To Train Summoning In RS3?
Craft the best pouch your charm supply supports while stacking boosts and using a calculator to avoid waste. For most mains, that means a Taverley-centered pouch loop with a route chosen for speed, value, or Ironman constraints, not a one-size-fits-all chart.
How Does Summoning Work In RS3?
You gain most Summoning XP by making pouches at obelisks using charms, spirit shards, an empty pouch, and a tertiary ingredient. Familiars created from those pouches then provide combat, utility, inventory, or skilling benefits.
Is Summoning Important In RS3?
Yes. Summoning remains important because familiars support combat, skilling, and quality of life, especially through Beast of Burden effects and other utility roles. Jagex’s beginner materials still present it as a practical support skill, not just a completionist checkbox.
Who Is The Summoning Tutor In RuneScape?
Pikkupstixin Taverleyis the key starting NPC most players use to orient themselves in Summoning. Jagex’s beginner materials still direct new players there.
What Is A Summoning Focus In RS3?
A Summoning focusis an item that boosts Summoning XP gains while you make pouches. The official GE guide price is 3,500 GP(Data as of April 2026; check the latest official guidance).
Which Charms Should I Prioritize In RS3?
Gold charms are usually the easiest to spend early, crimson often becomes your main training currency, and blue charms are usually the best tier to protect for stronger later pouches.
What Is The Cheapest Way To Train Summoning?
The cheapest route is the one that protects your hardest-to-replace charms, keeps GP-per-XP under control, and does not add expensive convenience items unless they truly pay for themselves. A calculator is the safest way to confirm that before you buy supplies.
What Is The Fastest Way To Train Summoning?
The fastest way is usually bulk pouch crafting with strong boosts, efficient banking, and high-XP pouch choices. Scroll conversion can push speed higher, but it generally increases cost.
Which Summoning Calculator Should I Use?
Use a calculator that accepts your current level, target level, charm counts, and preferred pouch mix. The best one is the one that models your real supplies instead of forcing you into a generic route.
Does Ironman Get Double XP For Summoning?
No. Jagex’s event pages have repeatedly stated that Ironman accounts do not receive the Double XP boost(Data as of April 2026; check the latest official guidance).
What Should I Do With Pouches After Making Them?
Keep the pouches that unlock useful familiars, convert to scrolls when your route values speed, and avoid treating every pouch as disposable. The right answer depends on whether the familiar itself solves a current gameplay problem.
Quick Recap
The cleanest way to train Summoning in RS3 is to stop asking for one universal “best pouch” and start asking the right question: best for what constraint?Once you choose between Fastest XP, Best value per charm, Best value per GP, and Ironman self-sufficiency, almost every other Summoning decision becomes easier.
If you remember only three things, remember these: protect rare charms, price-check live inputs, and let calculators overrule generic charts when your supplies are unusual. Do that, and you can move from “Summoning is expensive and annoying” to “Summoning is planned, predictable, and absolutely worth training.”
Continue Reading: MMORPGs On Google Play
Jump to
Your Master Guide To Summoning Training In RS3
Summoning Training RS3 At A Glance
How Summoning Works In RS3
Useful Items That Improve Summoning Training
Choose Your Training Lane Before You Spend Anything
Spirit Shards Explained
Which Pouches Should You Make?
Best Pouches To Make By Level
Which Charms Should You Spend First?
Best Ways To Obtain Charms In RS3
How To Make Pouches Efficiently
How Many Spirit Shards Should I Buy?
What To Do With The Pouches
Ironman Summoning Training RS3
Alternative Methods Of Gaining Summoning Experience
Best Familiars Worth Unlocking While You Train
Mistakes That Waste Charms, Shards, And GP
Summoning Training RS3 FAQ
Quick Recap
Latest Articles
Popular Articles