Uma Musume Character Tier List 2026: JP Meta Rankings
This uma musume character tier list focuses on real performance, skill activation, and distance relevance across different game modes.
Jan 31, 20264.6K Shares66.4K Views
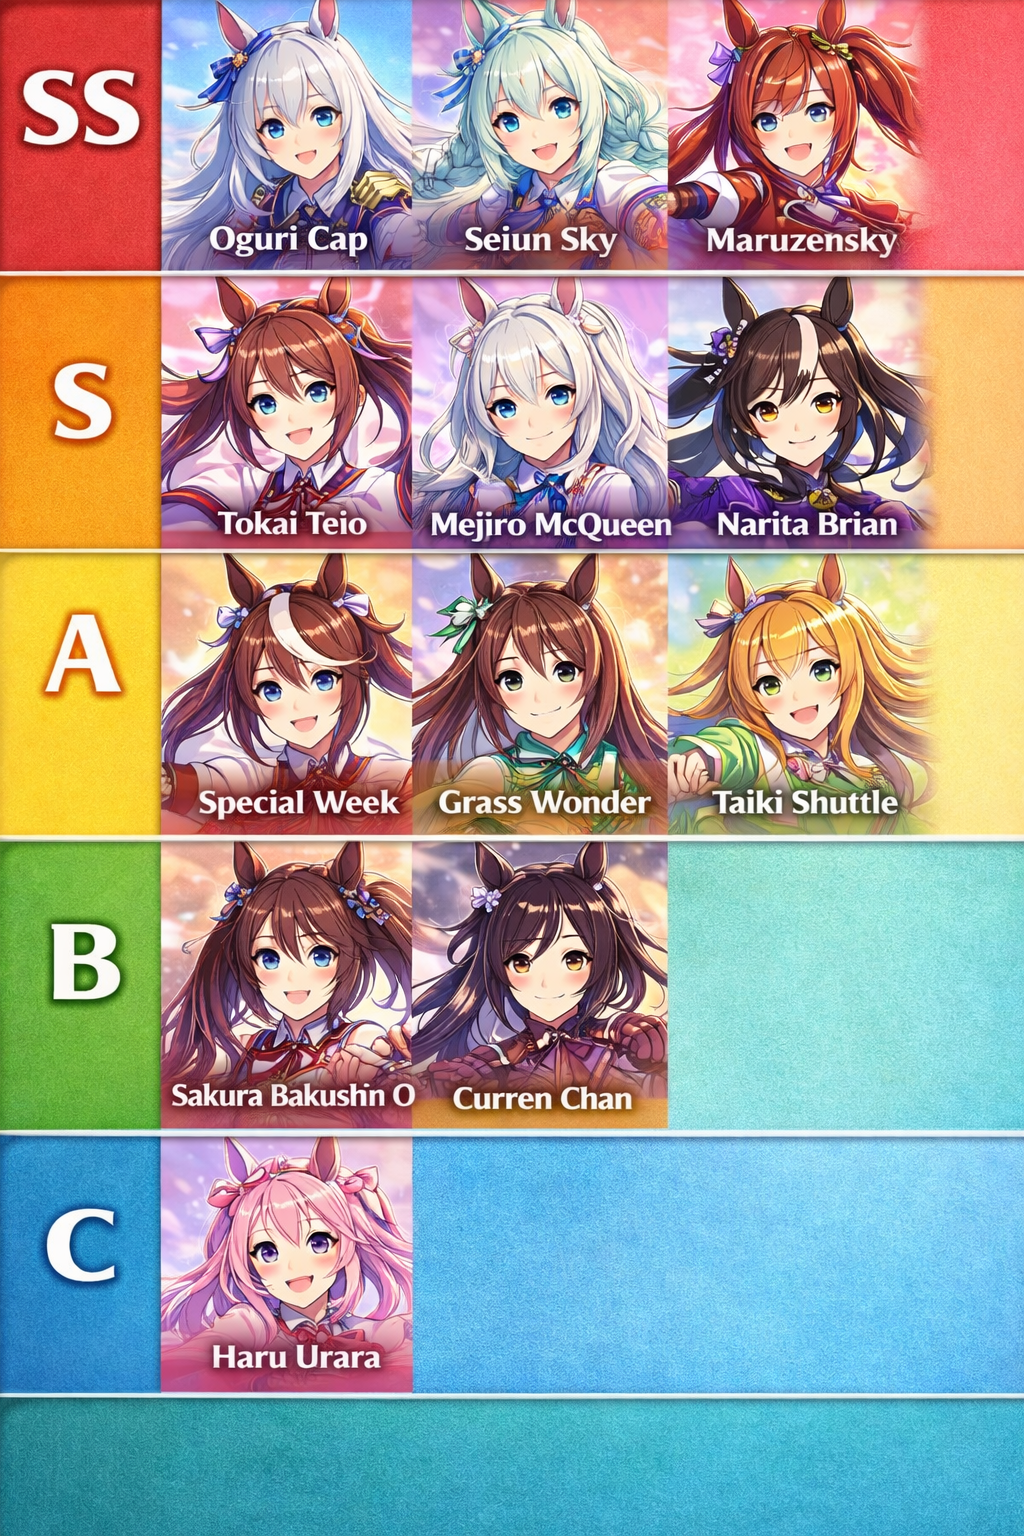
Uma Musume Character Tier List (JP Meta)
Uma Musume Pretty Derby rewards understanding more than raw stats. Two trainers can raise the same character with similar numbers and still get very different results because race flow, skill timing, and positioning matter just as much as speed or stamina. That gap is why many tier listsfeel unreliable.
Most tier lists fail because they treat Uma Musume as if it has one universal meta. In reality, character strength shifts based on distance, running style, and game mode. A character that dominates one Champion’s Meeting may struggle in the next, while another quietly performs well because her skills activate at the right moments.
This tier list follows the musume tier list JP approach, focusing on overall value, distance relevance, and skill reliability rather than chasing a single “best” pick. The goal is to help you understand which characters are worth investing in and why they perform the way they do.
Why a Single Uma Musume Tier List Falls Short
Uma Musume does not operate under one universal meta. Character strength changes depending on the game mode and how races are evaluated.
Different environments reward different priorities. Champion’s Meeting is purely about winning - finishing second offers no value, which makes acceleration timing, race control, and disruption far more important than long-term consistency. Team Trials, on the other hand, is a scoring-focused mode where steady placements, reliable skill activation, and low-risk builds outperform all-or-nothing strategies.
PvE content, including story and events, is far more forgiving. Flexibility, ease of training, and comfort matter more than tight optimization. A reliable all-rounder often performs better than a highly specialized build.
A useful Uma Musume character tier listmust reflect these differences. Ranking characters without explaining where they excel or struggle leads to confusion. That’s why this guide evaluates overall value first, then shows how that value shifts based on mode and distance.
How Tier Rankings Are Defined
SS Tiercharacters are meta-anchors. They either dominate specific distance categories or remain strong across multiple formats. Their kits are reliable, flexible, and scale exceptionally well with inheritance and support cards.
S Tiercharacters are core competitive picks. They can win consistently when built correctly but usually require more precise planning or favorable conditions than SS-tier characters.
A Tiercharacters are strong but conditional. They perform very well in the right races or roles but are not universally dominant.
B Tiercharacters are playable but situational. They are chosen for specific strategies, roster needs, or personal preference rather than raw efficiency.
C Tiercharacters are highly specialized or low impact in competitive environments, though they can still function well in story content or challenge runs.
See also:MCOC Tier List
Uma Musume Character Tier List – Overall Value and Practical Strength
SS Tier Characters
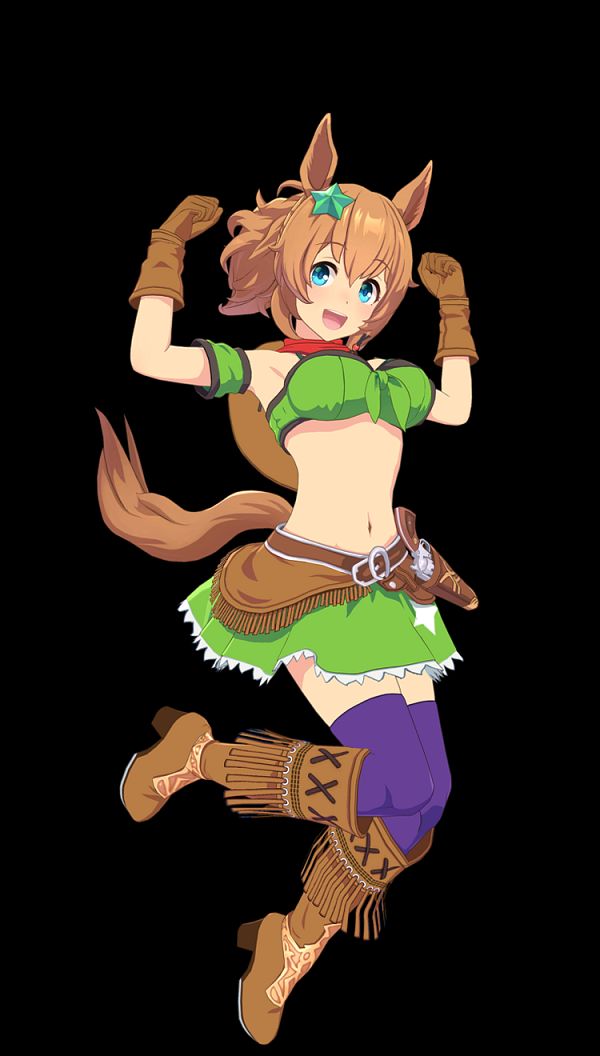
1. Oguri Cap (multiple variants)

Oguri Cap sits at the top because her strength is structural rather than situational. Her stat growth supports multiple build paths, allowing her to adapt to Mile and Medium distances easily while remaining viable in longer races with proper stamina planning. Her unique skills align naturally with race flow, meaning they activate without forcing awkward conditions or risky setups.
What truly separates Oguri Capis consistency. Slight errors in training rarely ruin her performance, and “good” runs often translate into strong race results. That forgiveness makes her valuable across Champion’s Meeting, Team Trials, and general play, and it’s why she remains relevant regardless of shifting metas.
2. Seiun Sky

Seiun Sky defines the escape archetype when played correctly. Rather than reacting to the race, she dictates it. Her value spikes in formats where early positioning and pace control determine outcomes, especially in medium and long distance races.
Seiun Sky punishes opponents who lack positioning tools or stamina discipline. When supported by builds that emphasize stability and well-timed acceleration, she can turn race flow itself into a weapon. However, she demands understanding of pacing and positioning mechanics, making her less forgiving than some top-tier picks.
3. Maruzensky (speed-focused variants)
Maruzensky thrives in speed-centric environments. In Short and Mile races, her ability to secure early position applies constant pressure on the field, often forcing opponents into inefficient lines. Many races involving Maruzensky are effectively decided before the final stretch even begins.
Her limitations appear in stamina-heavy formats, but specialization is not a weakness when the meta rewards it. In fast formats, she remains one of the most oppressive characters available.
S Tier Characters
4. Tokai Teio
Tokai Teio represents balance done right. Her speed growth and unique skill timing make her especially effective in Medium distance races, and she adapts well to different running styles. She does not demand extreme optimization to perform, which makes her a popular competitive choice.
Her defining strength is reliability. Tokai Teio rarely collapses due to minor training errors, and she rewards clean decision-making rather than perfection. For many players, she offers one of the best trade-offs between power and usability.
5. Mejiro McQueen
Mejiro McQueen excels in endurance-focused environments. Her stamina growth and stable pacing allow her to maintain pressure deep into long distance races, where others falter late. She is less flexible than top SS-tier characters, but within her niche she is extremely dependable.
Her builds prioritize endurance and recovery over explosive finishes. This makes her particularly effective in races where consistency and late-race survival matter more than early dominance.
6. Narita Brian
Narita Brian rewards aggressive, power-oriented builds. She excels in medium distance races where late-race pressure can overwhelm opponents. Her ceiling is high, but her floor is lower than more forgiving characters, making training discipline critical.
She shines in the hands of experienced players who understand how to balance power, stamina, and acceleration without overcommitting to any single stat.
7. Kitasan Black
Kitasan Black is a highly reliable performer, especially in Medium and Long distance races. Her balanced stat growth and stamina-focused kit allow her to maintain strong positioning throughout the race, while her skills support steady late-race pressure rather than risky all-in finishes. She may not dominate every format, but her consistency, flexibility, and synergy with stamina-oriented builds make her a strong and dependable S-tier pick in the current meta.
A Tier Characters
8. Special Week
Special Week is a true generalist. She performs adequately across a wide range of distances and is easy to train for story and event content. While she is rarely the optimal pick in high-level competitive play, she remains dependable and accessible.
Her unique skill is consistent rather than explosive. This reliability makes her safe but limits her ability to steal wins against highly optimized opponents.
9. Grass Wonder
Grass Wonder offers strong late-race potential but suffers from variability. When her skills activate under ideal conditions, she can win decisively. When they don’t, her performance drops sharply.
She is best suited for players who understand race flow and are comfortable building around conditional strengths rather than guaranteed outcomes.
10. Taiki Shuttle
Taiki Shuttle shines in Short and Mile races. Her speed scaling allows her to compete effectively in fast formats, but her value diminishes rapidly as stamina demands increase.
She is a strong pick when race distance aligns with her strengths and a weak one when it does not.
B and C Tier Characters – Niche and Limited Picks
11. Sakura Bakushin O (B Tier)
Sakura Bakushin O is built for one purpose: Short distance dominance. She is extremely easy to train and excels early in progression. Outside sprint formats, however, her limitations become apparent.
She is ideal for specific goals but not a long-term competitive anchor.
12. Curren Chan (B Tier)
Curren Chan is a strong specialist for short distance races, where early speed and clean positioning matter more than long-run endurance. She can deliver solid results in sprint-focused formats, but her value drops outside that niche, especially when stamina and recovery become major factors. If your roster needs a reliable short-distance pick, she’s worth building - just don’t expect her to carry across every mode or distance.
13. Haru Urara (C Tier)
Haru Urara is designed around persistence rather than performance. Her stat growth and race compatibility make competitive success difficult without extreme optimization. She is best enjoyed for personal challenges, storytelling, or collection purposes.
Quick Picks Based on Your Goal
Not every player is chasing the same outcome, and that’s why tier lists often feel confusing. The “best” character depends heavily on what you’re trying to achieve and what resources you have available. Use this section to narrow choices quickly before worrying about fine details.
Best picks for beginners
If you’re still learning training flow, inheritance, or skill timing, forgiving characters perform better than high-ceiling meta picks. Characters like Oguri Cap, Tokai Teio, and Special Week reward solid training without punishing small mistakes. They convert “good enough” runs into usable racers and help build confidence early.
Best picks for Champion’s Meeting
Champion’s Meeting is about securing first place, not consistency. Characters with strong acceleration timing, race control, or disruption perform best here. Seiun Sky excels when escape strategies are viable, while Maruzensky shines in speed-focused formats. These characters may feel average in other modes but spike hard when conditions favor them.
Best picks for Team Trials
Team Trials rewards stable placements and reliable skill activation across many races. Characters that activate multiple skills consistently and don’t rely on a single finisher tend to score higher overall. Balanced all-rounders often outperform risky, all-in builds in this mode.
Best picks if your support cards are limited
If your support deck isn’t fully optimized, avoid characters that demand perfect setups. Forgiving kits with flexible stat requirements perform better than characters that rely on tight stamina math or rare skill combinations. Consistency matters more than ceiling when support quality is uneven.
Choosing a character that matches your goal saves time, reduces frustration, and makes tier lists far more useful. A character that feels “weak” in one mode may be exactly what you need in another.
Team Roles in Uma Musume (Ace, Pace Setter, Closer, Disruptor)
Uma Musume races reward role clarity as much as raw strength. In competitive modes, characters perform specific jobs that influence race flow and final outcomes.
Ace (Primary Winner)
The Ace is your main win condition. This character is built to finish first through proper stat balance and reliable acceleration skills. Most top-tier characters perform best when used as an Ace in the right distance and running style.
Pace Setter (Race Control)
Pace Setters secure early position and shape race tempo. Usually escape or leader runners, they force opponents into inefficient paths and create favorable conditions for the Ace.
Closer (Late-Game Finisher)
Closers rely on late-race acceleration to overtake the field. They benefit from fast early pace and open positioning but are sensitive to race flow and timing.
Disruptor (Pressure Role)
Disruptors reduce opponent consistency through debuffs or awkward pacing. This role is most valuable in Champion’s Meeting, where preventing a rival win can decide the race.
Clear roles create synergy that raw tier rankings can’t show. A well-supported Ace often outperforms a stronger character placed into the wrong role.
Distance-Based Evaluation (Musume Tier List JP Approach)
Short distance races reward early speed, clean positioning, and minimal mistakes. Acceleration windows are tight, and being blocked is often fatal.
Mile races balance early positioning with late-race execution. Characters that combine speed with reliable acceleration tend to perform best.
Medium distance races are the most competitive category. Many characters qualify, which increases the importance of optimization, skill timing, and role selection.
Long distance races punish poor stamina management. Recovery skills and pacing are mandatory, and mistakes are amplified late in the race.
Evaluating characters by distance first reflects how competitive players build rosters in practice.
Uma Musume Skills Tier List – What Actually Decides Races
A useful Uma Musume skills tier list focuses on function, not rarity.
Acceleration skills are the most decisive category in competitive play. When stats are similar, acceleration determines who wins the final stretch.
Positioning and pacing skills reduce inefficiency. They prevent losses caused by running wide, getting boxed in, or wasting stamina.
Recovery skills enable aggressive strategies and are essential in long distance races.
Debuff skills matter most in Champion’s Meeting, where disrupting a single opponent can decide the race.
Skill reliability is critical. A powerful skill that rarely activates is worse than a modest skill that triggers consistently. This is why Wit investment and coherent builds matter more than stacking flashy skills.
Inheritance and Why It Changes Tier Placement
Inheritance can elevate or undermine a character’s tier placement.
Stat inheritance improves baseline consistency and smooths training variance. Skill inheritance enables access to acceleration or recovery tools a character may otherwise lack.
Some SS-tier characters remain strong even with average inheritance. Others rely heavily on strong parents to reach their full potential. Understanding this difference prevents wasted investment.
Common Reasons “Good Builds” Still Lose
Many losses come from invisible mistakes rather than obvious ones:
- Skills failing to activate due to low Wit
- Overcapping speed while neglecting stamina or recovery
- Choosing skills that activate too late or too early for the race
- Forcing a running style that conflicts with a character’s kit
Understanding race logic matters more than copying builds.
FAQs about Uma Musume Character Tier List
Why do musume tier list JP discussions emphasize distance so much?
Because race conditions rotate, and characters are balanced around distance-specific performance. Distance-first evaluation reflects real competitive play.
Are skills more important than characters?
At higher levels, yes. Characters define potential, but skills decide races.
Can lower-tier characters win competitive races?
Yes, with proper optimization and favorable conditions.
Should beginners follow tier lists strictly?
No. Beginners benefit more from flexible, forgiving characters.
Why do I lose races even when my stats are higher than everyone else?
Stats alone don’t win races. Positioning, skill timing, and stamina efficiency matter just as much. If key acceleration skills fail to activate, your runner gets boxed in, or stamina drops late, lower-stat opponents with better timing can still win.
Final Thoughts
A truly useful Uma Musume character tier list is not about declaring a single best character. It’s about understanding race flow, skill timing, and how kits interact with changing conditions. That is why musume tier list JP discussions focus on context rather than absolutes.
When you understand why a character wins, you stop chasing rankings and start building strategies. That knowledge remains valuable across metas, banners, and formats, and it is what ultimately turns consistent preparation into consistent victories.
Jump to
Uma Musume Character Tier List (JP Meta)
Why a Single Uma Musume Tier List Falls Short
How Tier Rankings Are Defined
Uma Musume Character Tier List – Overall Value and Practical Strength
Quick Picks Based on Your Goal
Team Roles in Uma Musume (Ace, Pace Setter, Closer, Disruptor)
Distance-Based Evaluation (Musume Tier List JP Approach)
Uma Musume Skills Tier List – What Actually Decides Races
Inheritance and Why It Changes Tier Placement
Common Reasons “Good Builds” Still Lose
FAQs about Uma Musume Character Tier List
Final Thoughts
Latest Articles
Popular Articles